Batman Arkham Origins – How to skip intro movies

There are arguably many things wrong with the state of Origins right now, but some of the most criminal is the waste of our time by presenting us with almost a minute of intro movies.

This is how you get rid of them.

I will list two ways of doing this, one is very simple the other takes 30 seconds to do. I usually do it the old school way, but that’s just me.

First method, and the simplest way:

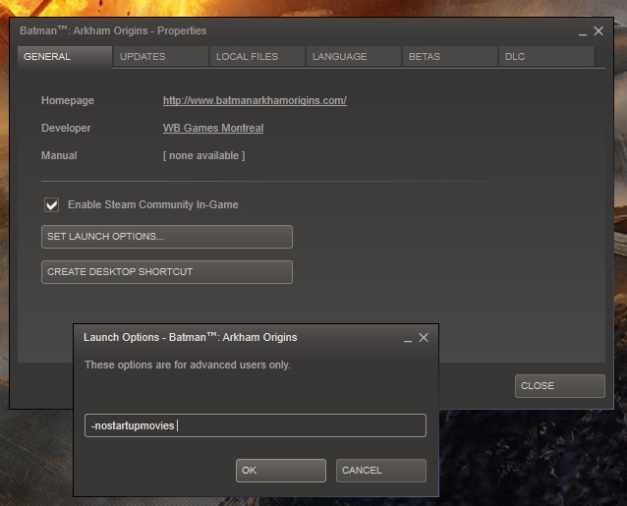
In your Steam game library view, find Batman Origins and Right click on it, hit the properties option. Now you should be in the General tab, and there is a “set launch options” button, click that and add this string.

-nostartupmovies 

Click OK, and your done. That’s it.

Billede

PS. This works on other Unreal Engine games too.

Second way of doing this, it a bit more involved then the first. But its how i usually do it.

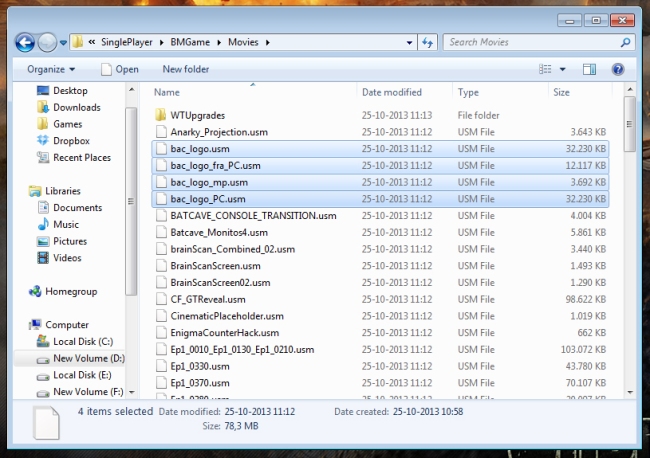
Go to your Steam folder and locate Batman Arkham Origins, and navigate to the following sub folder.

D:\Games\Steam\SteamApps\common\Batman Arkham Origins\SinglePlayer\BMGame\Movies

Billede

I have highlighted the files that needs to be changed or deleted. Now i just rename them by adding a .bak on the end of the file name, that way i know its a file that i have changed.

And that’s it. No more intros wasting your time, or blowing your ears out.
Outlast: How to tweak FOV, FPS, Texture Resolution, Motion Blur and more

How to Change FOV

Go to C:\Users\xxxx\Documents\My Games\Outlast\OLGame\Config and find “OLGame.ini”, open it up and look for

DefaultFOV=

RunningFOV=

The files can be a bit long and it can be hard to locate the string you want, so try and hit CTRL+F to bring up the search box, and enter the above mentioned strings.

Change the default values to the following. This gives the game a FOV of 90, and even though the default settings says 90, they are not. They are more like 65 or so.

DefaultFOV=110.0
RunningFOV=120.0

To get the same FOV when using the camera, look for the following lines.

CamcorderNVMaxFOV=83.0
CamcorderMaxFOV=83.0

And change them to this.

CamcorderNVMaxFOV=110.0
CamcorderMaxFOV=110.0

How to uncap FPS

Found in the same file as before the “OLEngine.ini” find the following lines.

bSmoothFrameRate=TRUE
MinSmoothedFrameRate=22
MaxSmoothedFrameRate=62

Change the values to the ones beneath.

bSmoothFrameRate=FALSE
MinSmoothedFrameRate=0
MaxSmoothedFrameRate=0

Higher Texture Resolution

This time you nedd the “OLEngine.ini” and the following lines.

MaxProcBuildingLODColorTextureSize=1024
MaxProcBuildingLODLightingTextureSize=256

As before change the default values to the ones underneath.

MaxProcBuildingLODColorTextureSize=2048
MaxProcBuildingLODLightingTextureSize=1024

How to remove Motion Blur

And we need yet another ini file to edit this time its the “OLSystemSettings.ini”

MotionBlur=True
MotionBlurPause=True
MotionBlurSkinning=1

Change to the following.

MotionBlur=False
MotionBlurPause=False
MotionBlurSkinning=0

How to Change Resolution, same ini as before “OLSystemSettings.ini” find.

ResX=
ResY=

And change it to the resolution you want.

ResX=1920
ResY=1080

A few other things, that might be worth changing. I wouldn’t do it as i find the film grain to add a lot to the game. And the battery life on the batteries where fine for me.
I had more than enough at all times. But here are some workaround.

How to change battery life

Open the “OlGame.ini” and find this string

BatteryDuration=150.0

The higher value the longer the batteries will last.

BatteryDuration=250.0

That should double the batteries life, but you can go higher if you want.

How to change the grain filter

Go to: C:\Program Files (x86)\Steam\SteamApps\common\Outlast\Engine\Config

Open up the “ConsoleVariables.ini” find this string

ImageGrain = 0.0″

Just set the values as listed here for no film grain.

How to unlock FPS and change FOV in Dead Space 3

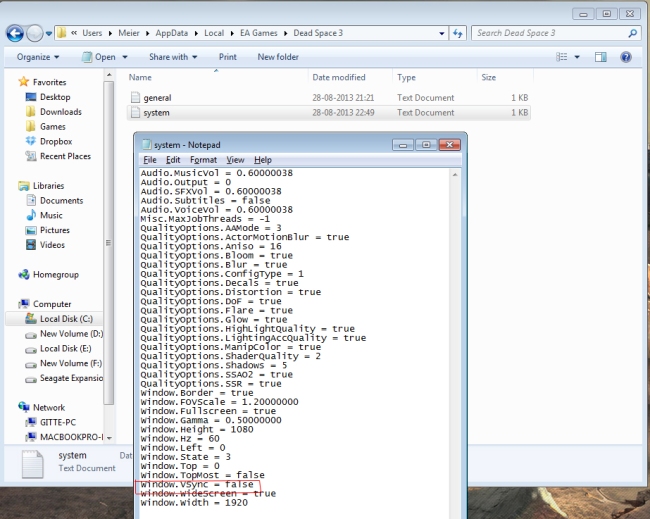
For some reason, when you enabled Vsync in the game, it locks it self to 30 FPS. For me that just feels way too sluggish. This is how i managed to get Dead Space 3 to run at 60 FPS or above.

Either put Vsynch off in the game or locate the following file, open it and change the value on the highlighted setting to “false”.

Billede

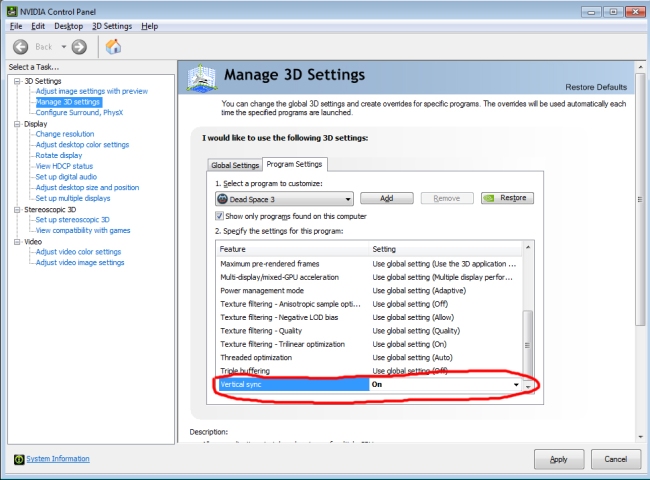
Next up, make your graphics card software control the Vsync. In this case i use the Nvidia control panel. But you can do it on AMD cards as well.

Billede

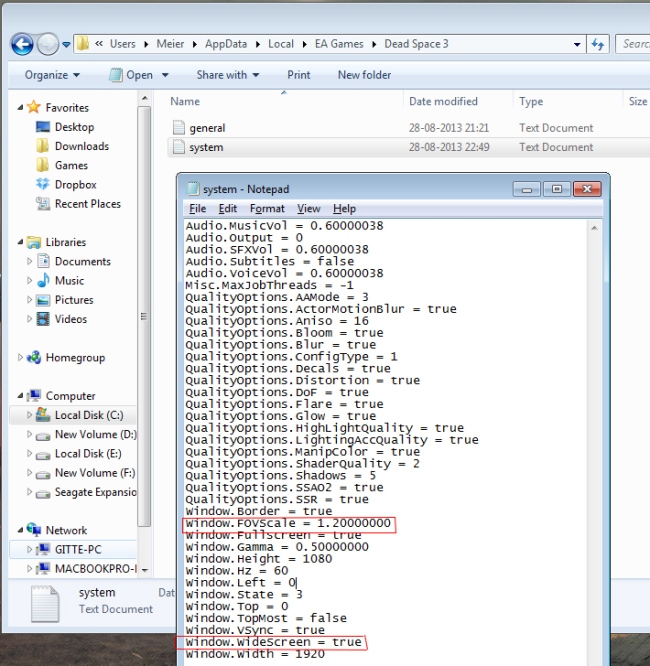
Now for the final part, changing the FOV. In the same file as before, change the following lines as highlighted in the picture.

Billede

Note this FOV is for a 16:9 monitor.

How to skip intro (brand) logos in Metro: Last Light on PC

It takes forever to get into the main menu on Metro: Last Light, and even by using this little tweak, you will have go to through a few logos that you can´t seem to skip.

But here we go.

Billede

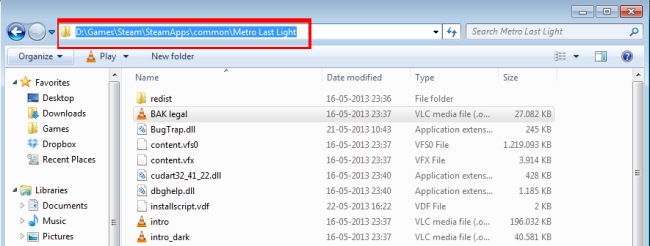
Head to your Steam folder, and navigate to the Metro: Last light directory. If you don´t know where that is, use the picture above to help you get there. NOTE! that in my case its my D: drive.

Billede

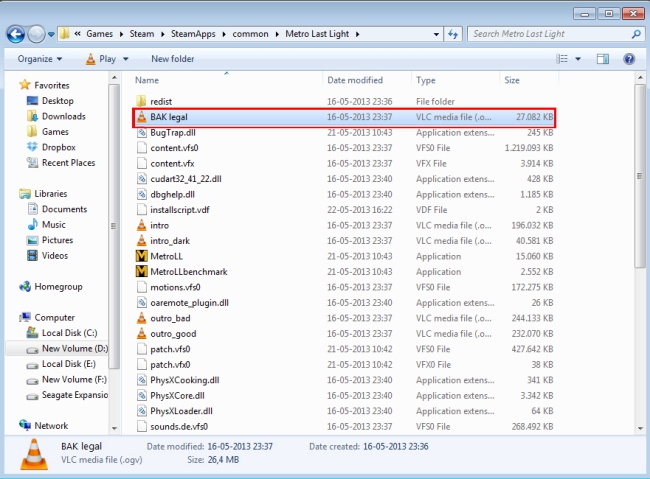
Next find the file named, legal (legal.ogv) rename it or delete it. I prefer to rename files instead of deleting them, but do whatever you feel like.

And that’s pretty much it, now you can start up the game, and by pass the first set of logos.

How to gain access/see your Library folder in OSX Lion

So i guess ever since Lion launched, Apple has made the user’s Library folder hidden for some reason. I didn’t even realize this for a longtime until i had to make some a backup for my Binding of Isaac save files. So at first i thought i was going insane, but luckily that wasn’t the case.

To reveal your Library folder all you need to do is fire up the Terminal and type or paste this in

chflags nohidden ~/Library

And thats it.

How to stop Quicktime from opening previous video

So this has annoyed me for far too long, and this will put and end to it. Fire up your Terminal, and type or paste in the following command

defaults write com.apple.QuickTimePlayerX NSQuitAlwaysKeepsWindows -bool false 

If you want to reverse it put ” true ” at the end of the command instead of ” false “

How to take screenshots from your iPad, iPhone, iPod Touch

I might be the only one who just found out about this, and i have no idea of when they added this feature. But if there are other like me who always wanted a screenshot feature, but never found a solution, this wold be it. No thirdparty apps needed or anything, its all native and in iOS.

1. Press and hold the POWER BUTTON

2. While holding the POWER BUTTON, press the HOME BUTTON

3. Or you can just quickly press both buttons simultaneously

Your screen will make a small white flash, and your screenshot it staken. Now you can go to Photos and find it, and you can mail it to your self of friends. This feature is very useful when used with the Dropbox App.

Heres a few random screenshots i took just for the purpose of showing it off.

XIII: How to set higher resolution and get widescreen support

XIII is a older game by now, and it lacks settings for higher resolutions above 1600×1200, and it also lacks better widescreen field of view. So this is how you fix that quick and easy.

NOTE. Do this before you start a new game.

Go to where your game is installed and find a folder named “System” once there look for a file named “Defuser.ini” when you locate it open it.

Look for these two lines:

DesiredFOV=85.000000
DefaultFOV=85.000000

If you have a monitor with a 16:9 ratio change the number to “100.000000” if your running with a 16:10 try “95.000000” as that seems to work pretty well. Save and exit.

Next look for a file called “XIII.ini” in the same folder, and open it up. And look for entries named

FullscreenViewportX=1024
FullscreenViewportY=768

And then change the resolution. In my case my native resolution is 1920×1080, so thats the value i put in. Save and exit when your done.

Now boot up the game and have fun.

How to shorten your Windows 7 boot time by a few seconds

Booting up your Windows box, or any other OS for that matter is not the most exciting thing in the world. And looking at boot up logos gets tiresome after a while. But for Windows 7 there is actually a way of removing the little animated Windows GUI in your boot sequence.

By removing this, your machine boots straight up into your Desktop or to your login screen, completely bypassing the logo, and therefore cutting off some precious seconds of boot time, it might not be by much but every second is welcome in my book. Plus I see it as a benefit that I don’t have to look at that damn logo anymore.

So here is the short run down on how you do this.


Hit up your Start menu, and type in:

msconfig

Next you get this window, in this window there are five fans. You need to click the one labeled “Boot”

Now locate the option that says “No GUI boot” and click the check box. Then click “Apply” and either restart your machine or just keep doing whatever you where before you did this.

Either way next time you boot up your machine, the logo will be gone, and you will be sent straight to your Desktop or Login screen.

How to add Notepad to your contextual menu in Windows 7

A friend of mine switched from Vista to Windows 7 at his work place, and what he used to do with an easy few clicks was not an option anymore. So I wanted to see if there was a way of getting that nice “Open with notepad” option into the contextual menu in Windows 7. There is but it takes a minute or two and a little tweaking in the Registry Editor.

First step is to open Registry Editor, or regedit as its called in short.

Goto your start menu and type this in:

regedit, and hit enter.

Now you get a windows with the Registry Editor, from here we need to navigate to:

HKEY_CLASSES_ROOT

*

Shell

Now right click on “shell” goto “New” and “Key”

Name the key “Open With Notepad”, now it should look like this

Now you right click the newly created “Open With Notepad” select “New” and “Key” again just like you did before.

Type in “command” as the name of the key. Now it should look like this.

Double click the ab(Default) icon in the window.

In the “Value data” text field type in “notepad %1” and hit OK, and your done.

Now whenever you highlight a file, you get the option to Open With Notepad.